• About us
  • Contact We
  • Cookie Policy
  • Privacy Policy
Anasayfa
  • Recipes
  • Knitting
  • Embroidery
  • Crochet
  • DIY
  • Search
A
Maximize
A
Minimize
Comments
  1. News
  2. DIY
  3. Make Herringbone Stitch Earrings
DIY
Yayınlanma: 01 April 2023 - 13:46

Make Herringbone Stitch Earrings

DIY
01 April 2023 - 13:46
Comments
SUBSCRIBESUBSCRIBE
Print
A
Maximize
A
Minimize
Comments
Make Herringbone Stitch Earrings

How to Make Herringbone Stitch Earrings

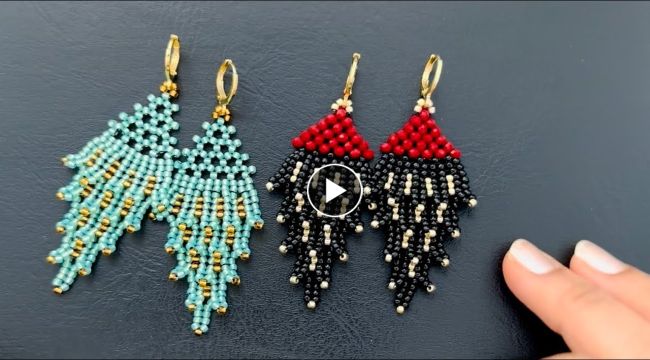
Herringbone stitch is a popular beading technique that creates a stunning, woven texture. With a little bit of practice, you can use this stitch to make beautiful, unique earrings that will add a touch of elegance to any outfit. In this tutorial, we'll guide you through the steps of making a pair of herringbone stitch earrings from start to finish.

Here's what you'll need:

  • Beads of your choice
  • Beading thread
  • Beading needle
  • Earring hooks
  • Scissors
Now that you have your materials, let's get started on your herringbone stitch earrings:

  1. Cut a length of beading thread, about 2 feet long, and thread your needle onto it. Tie a knot at one end of the thread, leaving a tail of about 2 inches.
  2. String two beads onto the thread and slide them down to the knot. Cross the needle back through the first bead to form a loop.
  3. Add two more beads and pass the needle through the second bead of the previous loop.
  4. Repeat step 3, alternating between adding two beads and passing the needle through the second bead of the previous loop, until you have reached your desired length.
  5. Tie off your thread by passing it through several beads and knotting it tightly. Trim any excess thread.
  6. Attach the earring hook to the top of the beaded strip by opening the loop at the bottom of the hook and sliding it through the top bead of the strip. Close the loop of the hook.
  7. Repeat steps 1-6 to create the second earring.
And there you have it - your very own herringbone stitch earrings! This elegant design can be made with any beads you like, making it perfect for customizing to your own personal style.

Remember to take your time and enjoy the process of making your earrings. With a little patience and creativity, you'll have a beautiful piece of jewelry that you can wear and cherish for years to come.

This news 906 hits received.
  • COMMENTS
Reply this user x
These news may also interest you
The Timeless Appeal of Vintage 1940s-1950s Can Openers
How to successfully grow Christmas cactus in a pot at home?
How to make ribbon rose
Make Beaded Friendship Bracelet
These news may also interest you
The Timeless Appeal of Vintage 1940s-1950s Can Openers
How to successfully grow Christmas cactus in a pot at home?
How to make ribbon rose
Make Beaded Friendship Bracelet
Make Interlaced Beaded Earrings
Most Read News
What Do Purple Spots on Thawed Chicken Really Mean?
Why Bubbles Appear The Moment You Open Canned Tomatoes
Recent Comments
Beautiful Chocolate Birthday Cake Decorating
Crochet Cord Made of 5-Petal Flowers
Baby Moses basket tutorial
Make a Simple Beaded Bracelet

Home
Recipes
Knitting
Embroidery
Crochet
DIY
Photo Gallery
  • Rss
  • About us
  • Contact We
  • Cookie Policy
  • Privacy Policy

All rights of the articles, videos, photos and news on our site are reserved.
Cannot be used without permission or showing the source.