• About us
  • Contact We
  • Cookie Policy
  • Privacy Policy
Anasayfa
  • Recipes
  • Knitting
  • Embroidery
  • Crochet
  • DIY
  • Search
A
Maximize
A
Minimize
Comments
  1. News
  2. DIY
  3. How to Make Beads Bracelet at Home: A Complete Guide
DIY
Yayınlanma: 10 March 2023 - 15:38

How to Make Beads Bracelet at Home: A Complete Guide

DIY
10 March 2023 - 15:38
Comments
SUBSCRIBESUBSCRIBE
Print
A
Maximize
A
Minimize
Comments
How to Make Beads Bracelet at Home: A Complete Guide

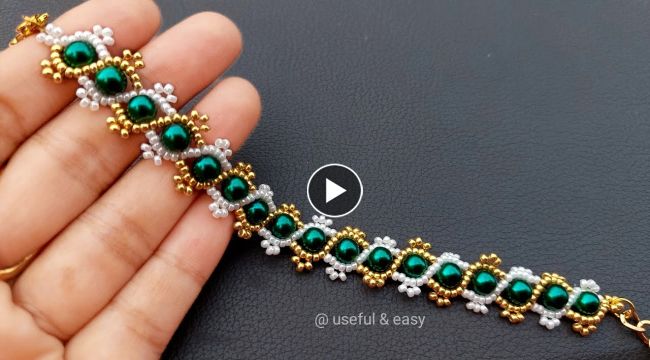
How to Make Beads bracelet at Home: A Complete Guide

Are you tired of buying expensive bracelets and looking for an affordable and creative alternative? Making your own beads bracelet at home is a great way to express your personal style while saving money. In this step-by-step guide, we'll show you how to make a beautiful beads bracelet that you can wear with pride.

What You'll Need

  • Elastic cord
  • Beads of your choice
  • Scissors
  • Measuring tape
  • Glue (optional)

Step 1: Measure Your Wrist

Using your measuring tape, measure your wrist to determine the length of your elastic cord. Add an additional inch to the measurement for a comfortable fit.

Step 2: Choose Your Beads

Choose the beads you want to use for your bracelet. You can use a mix of different colors and sizes, or stick to a single color scheme. Make sure that the beads have holes large enough to accommodate your elastic cord.

Step 3: String Your Beads

Cut a length of elastic cord based on the measurement you took in step 1. Tie a knot at one end of the cord to prevent the beads from falling off. String the beads onto the cord, making sure to leave enough cord at the end to tie another knot.

Step 4: Secure the Ends

Once you have strung all of your beads, tie a knot at the end of the cord to secure the beads in place. If you want extra security, you can apply a small amount of glue to the knot and let it dry.

Step 5: Trim the Ends

Carefully trim any excess elastic cord from the knots, making sure not to cut too close to the knot and risk it coming undone.

Step 6: Enjoy Your New Bracelet

Once you've finished trimming the ends, your beads bracelet is ready to wear! Put it on and show it off to your friends and family.

Making your own beads bracelet at home is a fun and easy DIY project that allows you to create unique and personalized accessories. With this guide, you can make a bracelet that matches your style and personality. Have fun and happy crafting!

This news 4603 hits received.
  • COMMENTS
Reply this user x
These news may also interest you
The Timeless Appeal of Vintage 1940s-1950s Can Openers
How to successfully grow Christmas cactus in a pot at home?
How to make ribbon rose
Make Beaded Friendship Bracelet
These news may also interest you
The Timeless Appeal of Vintage 1940s-1950s Can Openers
How to successfully grow Christmas cactus in a pot at home?
How to make ribbon rose
Make Beaded Friendship Bracelet
Make Interlaced Beaded Earrings
Recent Comments
Beautiful Chocolate Birthday Cake Decorating
Crochet Cord Made of 5-Petal Flowers
Baby Moses basket tutorial
Make a Very Simple Designer Beaded Bracelet

Home
Recipes
Knitting
Embroidery
Crochet
DIY
Photo Gallery
  • Rss
  • About us
  • Contact We
  • Cookie Policy
  • Privacy Policy

All rights of the articles, videos, photos and news on our site are reserved.
Cannot be used without permission or showing the source.