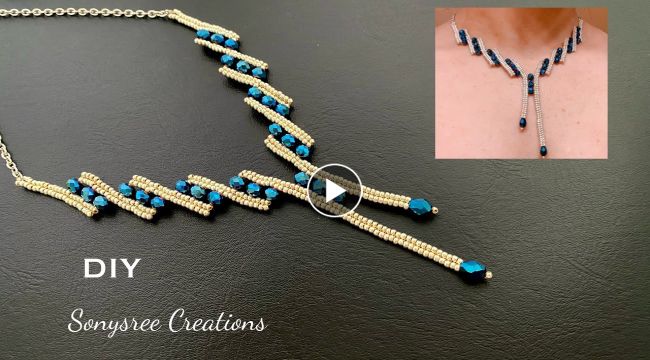
How to Make a Charming Beaded Necklace for the New Year
The new year is the perfect time to try new things and experiment with your creativity. Why not start by making your own
charming beaded necklace? With just a few materials and some basic
beading techniques, you can create a stunning accessory that will help you stand out in the crowd. Here's how to get started:
Materials:
- Beads in your choice of colors and shapes
- Jewelry wire
- Clasps
- Jump rings
- Wire cutters
- Round-nose pliers
Instructions:
Step 1: Choose your beads
The first step in making your
beaded necklace is to choose your beads. Pick beads in colors and shapes that complement each other and your personal style. You can choose beads that are all the same size and shape, or mix it up with different sizes and shapes for a more eclectic look.
Step 2: Cut the wire
Measure and cut a piece of
jewelry wire to the desired length of your necklace, adding a few extra inches to account for the clasp and jump ring. Use wire cutters to make a clean cut.
Step 3: Add the clasp
Using your round-nose pliers, create a loop at one end of the wire. Add a jump ring to the loop, then attach your clasp to the jump ring. Close the jump ring securely with your pliers.
Step 4: String the beads
Begin stringing your beads onto the wire in the desired
pattern. You can use a
beading pattern or simply string the beads in a random order. Use the pliers to create a loop at the other end of the wire once all the beads have been strung.
Step 5: Add the jump ring
Attach a jump ring to the loop you just created, and then attach the other half of the clasp to the jump ring. Close the jump ring securely with your pliers.
Step 6: Finishing touches
Trim any excess wire using the wire cutters, and use the pliers to tuck any sharp wire ends into the last few beads on either end of the
necklace.
Final Thoughts
Making your own beaded necklace is a fun and rewarding experience, and a great way to start the new year off with a touch of creativity. With these simple steps, you'll have a beautiful and charming necklace that you can wear with pride.