How to Knit Ring Bag pattern Baby vest with Two Skewers
Knitting a
baby vest is a great way to show your love for your little one. It can also be a fun and rewarding project to work on. In this tutorial, we'll walk you through the steps to
knit a ring bag pattern
baby vest with just two skewers.
Materials Needed
- 2 skeins of worsted weight yarn in your desired color
- Size 8 knitting skewers
- Stitch markers
- Tapestry needle
- Scissors
Step 1: Cast On
Using your first skein of yarn, cast on 44 stitches using the long tail cast on method. Make sure to leave a long tail for weaving in later. Place a stitch marker at the beginning of the row to mark the start of the round.
Step 2: Knit the First Few Rows
Knit the first 8 rows in stockinette stitch, making sure to knit in the round.
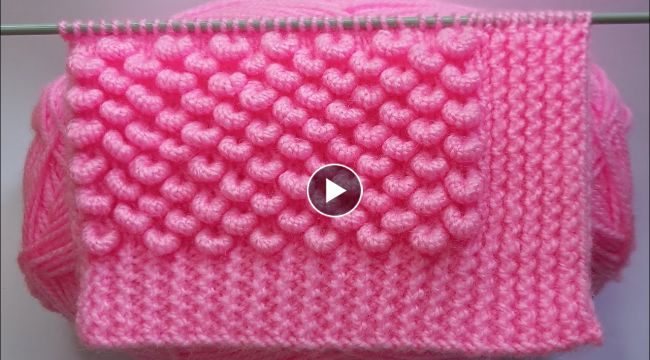
Step 3: Begin the Ring Bag Pattern
Now it's time to start the ring bag pattern. For this pattern, you'll need to alternate between knit and purl stitches to create a textured ring effect. The pattern should be as follows:
Round 1: Knit all stitches
Round 2: Knit 3, Purl 1, Knit 2, Purl 1, Knit 2, Purl 1, Knit 2, Purl 1, Knit 2, Purl 1, Knit 3
Round 3: Knit all stitches
Round 4: Knit 2, Purl 1, Knit 2, Purl 1, Knit 2, Purl 1, Knit 2, Purl 1, Knit 2, Purl 1, Knit 4Repeat rounds 1-4 until the vest measures approximately 8 inches from the cast on edge. Make sure to end on a round 3.
Step 4: Divide for Armholes
Now it's time to divide the work for the armholes. Knit the first 11 stitches of the round, place a stitch marker, and then knit the next 22 stitches. Place another stitch marker, and then knit the remaining 11 stitches.
Step 5: Knit the Front and Back Separately
Working on the back of the vest, knit the first 11 stitches and then turn your work. Purl the next row, and then continue working in stockinette stitch until the back measures approximately 6 inches from the armhole. Bind off all stitches.Working on the front of the vest, pick up the first stitch after the first stitch marker and knit in stockinette stitch until the front measures approximately 4 inches from the armhole. Place a stitch marker and then bind off the next 4 stitches. Knit to the end of the row.Turn your work and purl the next row. Continue working in stockinette stitch until the front measures the same length as the back. Bind off all stitches.
Step 6: Finish the Vest
Weave in all loose ends using a tapestry needle, and trim any excess yarn. Your
ring bag pattern baby vest is now complete and ready to be worn by your little one!This pattern can be easily customized by changing the colors of the yarn or adding embellishments such as buttons or embroidery. Have fun experimenting and creating unique pieces for your baby to wear.Now that you have successfully knit a ring bag
pattern baby vest with just
two skewers, you can tackle even more knitting projects. Keep practicing and exploring new patterns to become an expert knitter in no time!