• About us
  • Contact We
  • Cookie Policy
  • Privacy Policy
Anasayfa
  • Recipes
  • Knitting
  • Embroidery
  • Crochet
  • DIY
  • Search
A
Maximize
A
Minimize
Comments
  1. News
  2. DIY
  3. Create Your Own Pearl Beaded Bracelet for Beginners
DIY
Yayınlanma: 10 March 2023 - 14:58

Create Your Own Pearl Beaded Bracelet for Beginners

DIY
10 March 2023 - 14:58
Comments
SUBSCRIBESUBSCRIBE
Print
A
Maximize
A
Minimize
Comments
Create Your Own Pearl Beaded Bracelet for Beginners
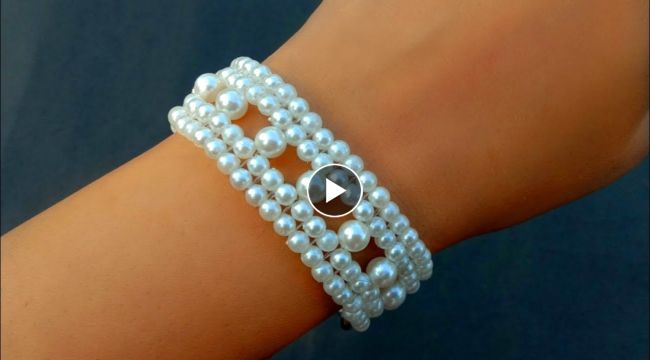
If you're a beginner to jewelry making, creating a pearl beaded bracelet is a great way to start. Pearls have been a timeless and classic jewelry accessory for centuries. They add elegance and sophistication to any outfit. Here's an easy step-by-step guide to creating your own pearl beaded bracelet:

Easy Steps to Create Your Own Pearl Beaded bracelet for Beginners

What You'll Need:

  • Pearl beads (in your desired size and color)
  • Jewelry wire (in a thickness appropriate for your beads)
  • Two crimp beads
  • Jewelry clasp
  • Jewelry pliers

Instructions:

  1. Measure your wrist with a tape measure to determine the length of wire needed for your bracelet. Add an additional inch to the length to allow for the clasp and a bit of extra room.
  2. Cut the jewelry wire to the desired length using wire cutters.
  3. Thread a crimp bead onto one end of the wire, followed by one half of the jewelry clasp.
  4. Loop the end of the wire back through the crimp bead, creating a loop around the clasp. Use the jewelry pliers to flatten the crimp bead and secure the loop in place.
  5. Thread your pearl beads onto the wire in the desired pattern and quantity. Leave enough space at the end of the wire to repeat step 3 with the remaining crimp bead and the other half of the jewelry clasp.
  6. Loop the end of the wire back through the crimp bead and the other half of the jewelry clasp, creating a loop around the clasp. Use the jewelry pliers to flatten the crimp bead and secure the loop in place.
  7. Use the jewelry pliers to trim any excess wire from both ends of the bracelet.
  8. Your pearl beaded bracelet is now complete and ready to wear!
There you have it, an easy step-by-step guide to creating your own pearl beaded bracelet. With just a few supplies and some patience, you can create a beautiful piece of jewelry to wear or give as a gift. This bracelet is perfect for weddings, proms, or any special occasion where you want to add a touch of elegance to your outfit.

Happy beading!

This news 3179 hits received.
  • COMMENTS
Reply this user x
These news may also interest you
The Timeless Appeal of Vintage 1940s-1950s Can Openers
How to successfully grow Christmas cactus in a pot at home?
How to make ribbon rose
Make Beaded Friendship Bracelet
These news may also interest you
The Timeless Appeal of Vintage 1940s-1950s Can Openers
How to successfully grow Christmas cactus in a pot at home?
How to make ribbon rose
Make Beaded Friendship Bracelet
Make Interlaced Beaded Earrings
Recent Comments
Beautiful Chocolate Birthday Cake Decorating
Crochet Cord Made of 5-Petal Flowers
Baby Moses basket tutorial
Make a Very Simple Designer Beaded Bracelet

Home
Recipes
Knitting
Embroidery
Crochet
DIY
Photo Gallery
  • Rss
  • About us
  • Contact We
  • Cookie Policy
  • Privacy Policy

All rights of the articles, videos, photos and news on our site are reserved.
Cannot be used without permission or showing the source.