• About us
  • Contact We
  • Cookie Policy
  • Privacy Policy
Anasayfa
  • Recipes
  • Knitting
  • Embroidery
  • Crochet
  • DIY
  • Search
A
Maximize
A
Minimize
Comments
  1. News
  2. Knitting
  3. Sliced Cardigan Knitting Pattern
Knitting
Yayınlanma: 23 February 2023 - 01:58

Sliced Cardigan Knitting Pattern

Knitting
23 February 2023 - 01:58
Comments
SUBSCRIBESUBSCRIBE
Print
A
Maximize
A
Minimize
Comments
Sliced Cardigan Knitting Pattern
Sliced cardigans are a versatile and comfortable addition to any wardrobe. These cardigans can be knit in a variety of styles and designs, making them a popular choice for both casual and formal occasions. In this post, we'll discuss a knitting pattern for a sliced cardigan that can be easily made with two needles.

Materials Needed To make this sliced cardigan, you'll need the following materials:

  • Worsted weight yarn (approximately 800-1200 yards)
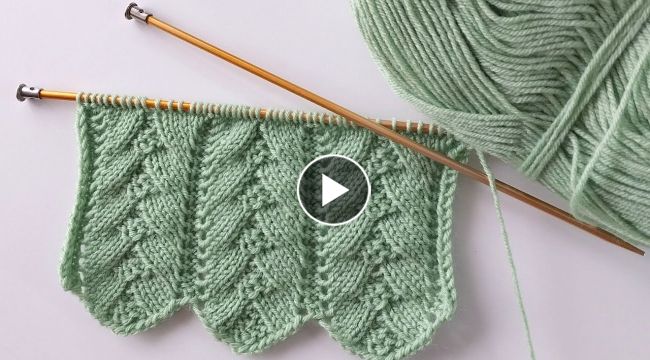
  • 5mm knitting needles
  • Scissors
  • Tapestry needle
  • Stitch markers
Pattern Instructions Follow these steps to knit your sliced cardigan:

Step 1: Cast on 140 stitches.

Step 2: Work in garter stitch (knit every row) until the piece measures approximately 20 inches from the cast-on edge.

Step 3: Place a marker at the center of the piece.

Step 4: Continue working in garter stitch, decreasing two stitches on each side of the center marker every other row. Repeat this until you have 16 stitches remaining on each side of the marker.

Step 5: Once you have 16 stitches on each side of the center marker, begin to work in stockinette stitch (knit on the right side, purl on the wrong side). Work in stockinette stitch until the piece measures approximately 40 inches from the cast-on edge.

Step 6: Place a marker at each end of the piece.

Step 7: Work in garter stitch for the next 6 rows, working one stitch on each side of the markers as a decrease. Repeat this until you have 16 stitches remaining on each side.

Step 8: Bind off all stitches.

Finishing To finish your sliced cardigan, follow these steps:

Step 1: Cut the yarn, leaving a long tail.

Step 2: Use the tapestry needle to weave in the ends.

Step 3: Fold the piece in half, aligning the bound off edges.

Step 4: Use the tapestry needle to sew the side seams together.

Step 5: Fold the sleeves in half and sew the side seams.

Step 6: Use the tapestry needle to weave in any remaining ends.

Your sliced cardigan is now complete and ready to wear.

Conclusion Knitting a sliced cardigan with two needles is an enjoyable and rewarding project. With just a few simple instructions and some basic materials, you can create a stylish and comfortable addition to your wardrobe. Use this pattern to create your own unique cardigan, and enjoy the warmth and comfort it provides.

This news 6918 hits received.
  • COMMENTS
Reply this user x
These news may also interest you
Wee Willie Layette
Wee Willie Layette
Knitted Animal Scarves
2 traditional stitches for stick knit hats
Free Water Lily knitting patter
These news may also interest you
Wee Willie Layette
Wee Willie Layette
Knitted Animal Scarves
2 traditional stitches for stick knit hats
Free Water Lily knitting patter
Poncho de punto de último diseño colorido
Recent Comments
Beautiful Chocolate Birthday Cake Decorating
Crochet Cord Made of 5-Petal Flowers
Baby Moses basket tutorial
The best two knitting needles

Home
Recipes
Knitting
Embroidery
Crochet
DIY
Photo Gallery
  • Rss
  • About us
  • Contact We
  • Cookie Policy
  • Privacy Policy

All rights of the articles, videos, photos and news on our site are reserved.
Cannot be used without permission or showing the source.