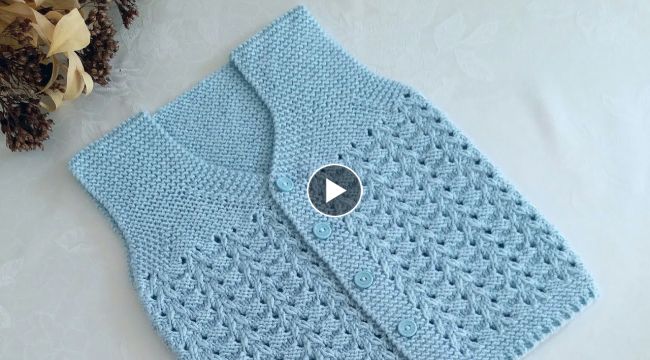
How to Knit Embossed Openwork Model Baby Vest
Knitting a baby
vest can be a great way to showcase your creativity and love for your little ones. This tutorial will guide you step-by-step on how to knit an
embossed openwork model baby vest. This
pattern is perfect for intermediate to advanced knitters who are comfortable with basic knitting techniques such as casting on, binding off, knitting, and purling.
Materials Needed
To start this project, you will need the following:
- 2 skeins of baby yarn in your chosen color
- Size 5 circular knitting needles
- Stitch markers
- Tapestry needle
- Scissors
Instructions
Step 1: Cast On
Cast on 84 stitches onto your circular knitting needles using the long tail cast on method. Place a stitch marker to mark the beginning of the round and join in the round, being careful not to twist your stitches.
Step 2: Knit the Body
Knit the body of the vest in the
embossed openwork pattern as follows:
- Round 1: *Knit 2, purl 2, repeat from * to end of round
- Round 2: *Purl 2, knit 2, repeat from * to end of round
- Round 3: Knit all stitches
- Round 4: *Knit 2, yarn over, slip 1, knit 1, pass slipped stitch over, yarn over, repeat from * to end of round
Repeat these 4 rounds until the vest measures approximately 6 inches from the cast on edge, ending with a round 2.
Step 3: Divide for the Armholes
Next, you will divide the work for the armholes as follows:
- Knit the first 21 stitches of the round and place a stitch marker.
- Bind off the next 21 stitches, knit across the next 42 stitches, place a stitch marker.
- Knit to the end of the round.
Step 4: Knit the Back
Knit the back of the vest as follows:
- Row 1: Knit all stitches
- Row 2: Purl all stitches
- Row 3: *Knit 2, purl 2, repeat from * to last 2 stitches, knit 2
- Row 4: Purl all stitches
- Row 5: *Knit 2, yarn over, slip 1, knit 1, pass slipped stitch over, yarn over, repeat from * to last 2 stitches, knit 2
- Row 6: Purl all stitches
Repeat these 6 rows until the back measures approximately 5 inches from the armhole bind off, ending with a row 6.
Step 5: Knit the Fronts
Knit the front of the vest as follows:
- Row 1: Knit all stitches
- Row 2: Purl all stitches
- Row 3: *Knit 2, purl 2, repeat from * to last 11 stitches, knit 2, place a stitch marker, knit 7, place a stitch marker, knit 2
- Row 4: Purl all stitches
- Row 5: *Knit 2, yarn over, slip 1, knit 1, pass slipped stitch over, yarn over, repeat from * to last 11 stitches, knit 2, place a stitch marker, knit 7, place a stitch marker, knit 2
- Row 6: Purl all stitches
- Row 7: Knit all stitches up to the first stitch marker, slip the 7 stitches between the markers onto a holder, cast on 5 stitches using the backward loop cast on method, knit to the end of the row.
- Row 8: Purl all stitches
- Row 9: *Knit 2, purl 2, repeat from * to last 2 stitches, knit 2
- Row 10: Purl all stitches
- Row 11: *Knit 2, yarn over, slip 1, knit 1, pass slipped stitch over, yarn over, repeat from * to last 2 stitches, knit 2
- Row 12: Purl all stitches
Repeat these 12 rows until the front measures approximately 4 inches from the armhole bind off, ending with a row 12.
Step 6: Knit the Shoulders and Collar
Rejoin the yarn at the left shoulder and knit across the stitches to the stitch marker. Slip the 7 held stitches onto the needle and knit across them.Next, you will work the collar as follows:
- Row 1: Knit all stitches
- Row 2: Purl all stitches
- Row 3: Knit all stitches
- Row 4: Purl all stitches
- Row 5: *Knit 2, purl 2, repeat from * to end of row
- Row 6: Purl all stitches
- Row 7: Knit all stitches
- Row 8: Purl all stitches
- Bind off all stitches.
Step 7: Finishing
Use a tapestry needle to weave in all the loose ends and block the vest to your desired size and shape.And there you have it - a beautiful and unique embossed openwork model
baby vest that will keep your little one cozy and stylish!