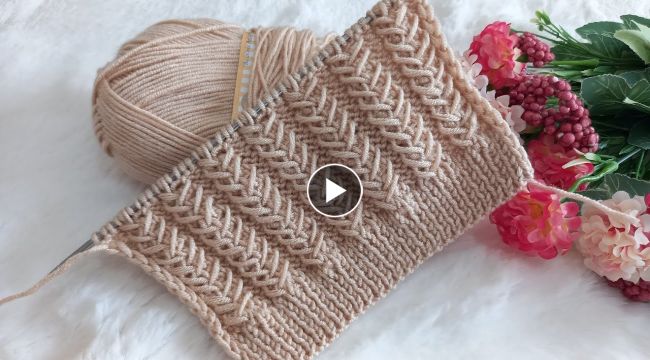
How to Knit a vest with Chain Blocks Model with Two Needles
Knitting is a wonderful craft that allows you to create beautiful and functional garments. If you're looking for a new
knitting project, why not try knitting a vest with a
chain blocks model? This
pattern is simple and easy to follow, and you only need
two needles and some yarn to get started. In this tutorial, we'll walk you through the steps to knit your own
vest with a chain blocks model.
Materials You'll Need
- Worsted weight yarn
- Size 8 (5.0 mm) knitting needles
- Scissors
- Tapestry needle
Step 1: Cast On Stitches
To begin, cast on 90 stitches using the long-tail cast-on method. This will be the bottom edge of your vest.
Step 2: Knit the First Row
Knit the first row of stitches, which will create the first row of the
chain blocks pattern.
Step 3: Chain Blocks Pattern
The chain blocks
pattern is created by alternating rows of knit and purl stitches. Here's how to do it:
- Row 1 (RS): Knit all stitches
- Row 2 (WS): Purl all stitches
- Row 3: K2, *P2, K2; repeat from * to end of row
- Row 4: P2, *K2, P2; repeat from * to end of row
- Repeat rows 1-4 until your work measures approximately 15 inches from the cast-on edge.
Step 4: Divide for Armholes
Once your work measures approximately 15 inches, it's time to divide for the armholes. Here's how:
- Knit the first 35 stitches, then bind off the next 20 stitches. Knit the remaining 35 stitches.
- Working on the right side of your work, knit the first 35 stitches, cast on 20 stitches using the backward loop method, and knit the remaining 35 stitches. This will create the armholes.
Step 5: Continue Knitting
Continue knitting in the chain blocks pattern until your work measures approximately 20 inches from the cast-on edge.
Step 6: Shape the Shoulders
Once your work measures approximately 20 inches, it's time to shape the shoulders. Here's how:
- Knit the first 12 stitches, then bind off the next 11 stitches. Knit the remaining 12 stitches. This will create the shoulder on the right side of your work.
- Working on the right side of your work, knit the first 12 stitches, cast on 11 stitches using the backward loop method, and knit the remaining 12 stitches. This will create the shoulder on the left side of your work.
Step 7: Finish the Vest
Continue knitting in pattern until you have reached the desired length for the back of the vest.
Knitting the Fronts
Using the same yarn and needles, cast on 55 stitches. Work in the Chain Block pattern as follows:
- RS Row 1: K1, *P2, K5; repeat from * to last 4 stitches, P2, K2
- WS Row 2: P2, *K2, P3; repeat from * to last stitch, K1
- RS Row 3: K2, *P2, K3, P2; repeat from * to last 4 stitches, P2, K2
- WS Row 4: P2, *K2, P3; repeat from * to last stitch, K1
- RS Row 5: K2, *P2, K1, P2, K3; repeat from * to last 4 stitches, P2, K2
- WS Row 6: P2, *K2, P3; repeat from * to last stitch, K1
Continue working in pattern until the front piece measures approximately the same length as the back piece. Bind off all stitches.
Finishing the Vest
Using a tapestry needle and matching yarn, sew the shoulders together using a mattress stitch. Sew the side seams of the vest together in the same manner.For the armhole and neck edging, pick up stitches along the edges of the vest and work in garter stitch for approximately 1 inch. Bind off all stitches and weave in any loose ends.Your knit vest with a chain block pattern is now complete and ready to wear!Experiment with different yarn colors and types to create a unique and versatile piece for your wardrobe.Happy knitting!