• About us
  • Contact We
  • Cookie Policy
  • Privacy Policy
Anasayfa
  • Recipes
  • Knitting
  • Embroidery
  • Crochet
  • DIY
  • Search
A
Maximize
A
Minimize
Comments
  1. News
  2. Knitting
  3. Knit Embossed Lozenge Two-Needle Knitted Vest
Knitting
Yayınlanma: 27 March 2023 - 00:15

Knit Embossed Lozenge Two-Needle Knitted Vest

Knitting
27 March 2023 - 00:15
Comments
SUBSCRIBESUBSCRIBE
Print
A
Maximize
A
Minimize
Comments
Knit Embossed Lozenge Two-Needle Knitted Vest
Looking for a knitting project that will add some texture and dimension to your wardrobe? Look no further than the embossed lozenge two-needle knitted vest. This beautiful and unique design is sure to turn heads and make a statement. Follow this step-by-step tutorial to learn how to knit your own embossed lozenge vest.

How to Knit Embossed Lozenge Two-Needle Knitted Vest

Step 1: Gather Your Materials

Before you begin knitting, gather the following materials:

  • Size 7 or 8 knitting needles
  • Three skeins of worsted weight yarn in your preferred color
  • A stitch holder
  • A tapestry needle
  • Scissors

Step 2: Cast On Stitches

Using the long-tail cast on method, cast on 86 stitches using one of the knitting needles. This will be the back of your vest.

Step 3: Create the Embossed Lozenge Pattern

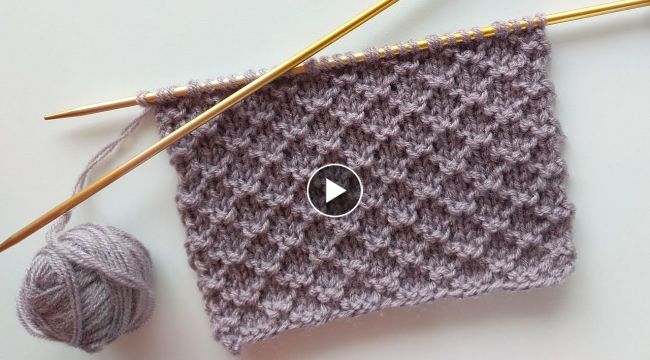
The embossed lozenge pattern is a unique and eye-catching design that will make your vest stand out. To create the pattern, follow these instructions:

  • Rows 1-2: Knit all stitches
  • Rows 3-4: Purl all stitches
  • Rows 5-6: Knit all stitches
  • Rows 7-10: Follow the embossed lozenge pattern chart (the white squares represent knit stitches, while the black squares represent purl stitches)
  • Repeat rows 1-10 until the back piece measures 12 inches from the cast on edge.

Step 4: Create the Front Pieces

Using the second knitting needle, create two front pieces that are identical to the back piece, but with a neckline cutout. To create the cutout, knit the first 35 stitches, bind off the next 16 stitches, and then knit the remaining 35 stitches.

Step 5: Join the Pieces Together

Using the stitch holder, hold the back piece and one front piece together at the shoulders. Knit the stitches from the stitch holder onto the needle and then seam the front pieces to the back piece at the shoulders and sides.

Step 6: Finish the Vest

Once the vest is seamed together, continue knitting the embossed lozenge pattern for another 2 inches. Then, bind off all stitches and weave in the ends using the tapestry needle.

And there you have it! Your very own embossed lozenge two-needle knitted vest. This unique and stylish design is perfect for adding some texture and dimension to your wardrobe. Wear it with pride and enjoy the compliments you'll receive on your beautiful creation.

Knitting is a wonderful and rewarding hobby that allows you to express your creativity while creating beautiful and useful garments. So, if you're looking for a new project, try your hand at this embossed lozenge vest and create a one-of-a-kind piece that you'll cherish for years to come.

This news 843 hits received.
  • COMMENTS
Reply this user x
These news may also interest you
Wee Willie Layette
Wee Willie Layette
Knitted Animal Scarves
2 traditional stitches for stick knit hats
Free Water Lily knitting patter
These news may also interest you
Wee Willie Layette
Wee Willie Layette
Knitted Animal Scarves
2 traditional stitches for stick knit hats
Free Water Lily knitting patter
Poncho de punto de último diseño colorido
Recent Comments
Beautiful Chocolate Birthday Cake Decorating
Crochet Cord Made of 5-Petal Flowers
Baby Moses basket tutorial
Make a Bracelet Using Abacus Beads

Home
Recipes
Knitting
Embroidery
Crochet
DIY
Photo Gallery
  • Rss
  • About us
  • Contact We
  • Cookie Policy
  • Privacy Policy

All rights of the articles, videos, photos and news on our site are reserved.
Cannot be used without permission or showing the source.